This box controls the diffractometer and chart recorder during a scan. Normally it is under computer control and you can skip this section. If you wish to do manual scans, or have to set the goniometer to particular positions for X-ray optics alignment, this section is for you.

The twelve numeric keys in the middle have obvious data entry functions. Entering a number such as 2.5 enters that number, except when entering the chart scale. For the chart scale, the decimal point means “ten to the power of”, so 2.5 means 2×10⁵.
Before a scan, pressing any of the eight keys on the left will change what the numeric keys in the middle are setting. During a scan, pressing any of the eight keys on the left display the current scan setting, or the goniometer 2Θ angle.
The six keys on the right control the goniometer.
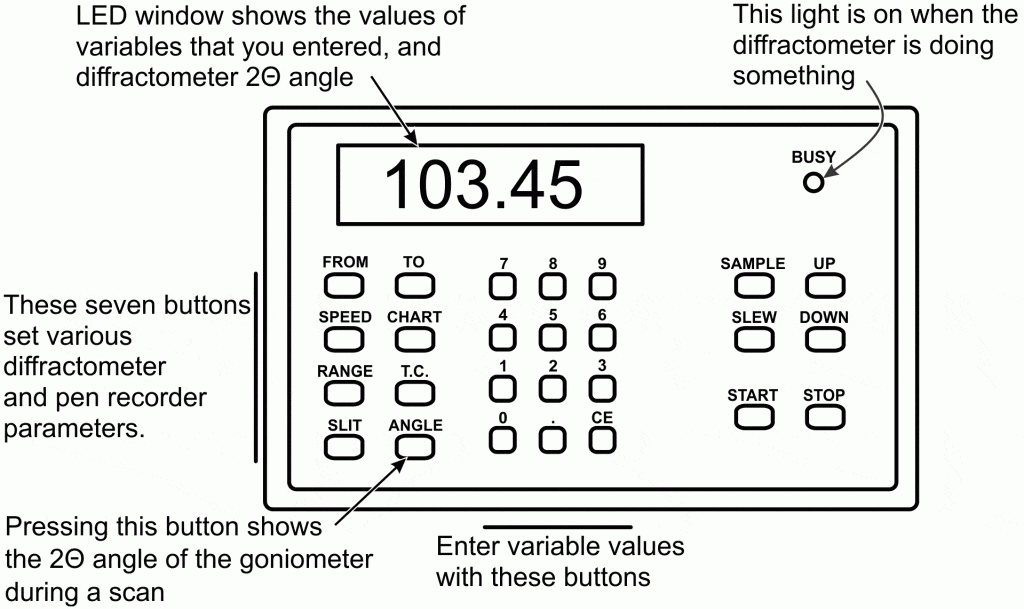
This is a labeled cartoon of the control box photo. See the table below for details.
| Button | Purpose |
| FROM | Start angle for the scan. This can range from 0 to 120° 2Θ in multiples of 0.01° 2Θ. |
| TO | Stop angle for the scan. This can range from 0 to 120° 2Θ, in multiples of 0.01°. This must be larger than the FROM angle. |
| SPEED | Goniometer scan rate: 0.001, 0.002, 0.005, 0.01, 0.02, 0.05, and 0.1° 2Θ/second. |
| CHART | Chart recorder paper speed: 5, 10, 20, and 50 mm/° 2Θ. |
| RANGE | The full-scale range for the chart paper or computer recording, in counts/second. The record will range from 0 to the full scale counts/second. Larger peaks will go off scale, and be recorded as the maximum. 10,000 counts/second is a good starting point. RANGE values are: 500, 1000, 2000, 5000, 10,000, 20,000, 50,000, 100,000, 200,000, 500,000 counts/second. These values are entered using the keypad like this: 500 = 5.2, 10,000 = 1.4, and 100,000 = 1.5. The first digit is the multiplier, the second is the exponent. |
| T.C. | Time constant. This is the time in seconds over which the X-ray detector signal is averaged. Longer yields a smoother the pattern. Too short and the trace is unnecessarily wiggly because of statistically fluctuations in the signal. Too long and peaks become broader, shorter, and displaced to higher 2Θ angles. In general, the time constant should not be longer than 1/50 of the time it takes to scan 1° 2Θ, which is the amount of time needed to scan 0.02° 2Θ (1/50 of 1° 2Θ). For example, if the scan rate is 0.01° 2Θ/second, then 1° is covered in 100 seconds, so 2 seconds would be the longest reasonable time constant. Time constant values are: 0.2, 0.5, 1, 2, 5, 10, and 20 seconds. Under computer control, the time constant is always whatever time it takes to move 0.01° 2Θ |
| SLIT | This value is analogous to the “detector slit” on other instruments. Our detector does not really have a slit. Instead, the active area of the solid-state detector is varied. In principle, the narrower the slit, the higher the 2Θ resolution, but the lower the count rate. In practice on our instrument, narrowing the slit reduces count rate but does not increase resolution, so always use the 0.3 mm slit. Permitted slit widths are 0.05, 0.1, 0.2, and 0.3 mm. |
| ANGLE | Press this to display the current goniometer angle. |
| SAMPLE | We don’t have an automatic sample changer, so this button does nothing. |
| UP and DOWN | Pressing these will cause the goniometer to go up or down in increments of 0.01° 2Θ. |
| SLEW | This tells the goniometer to go to a specific 2Θ position. To do this, press SLEW, then enter the 2Θ position using the numeric keys; then press START. |
| START | Starts the goniometer to do a scan using the set scan parameters. The chart recorder first advances to the next line, and starts automatically. If SLEW has been pressed, then the goniometer simply moves to the entered position. For goniometer adjustments, if CHART is set to zero, START turns on the chart recorder, letting it act as an intensity meter. |
| STOP | Stops the goniometer and chart recorder from doing whatever they were doing. |
