Basics
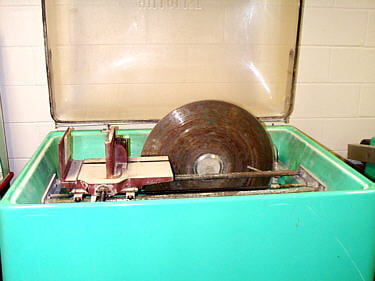
The large diamond saw is used to cut large or awkward rocks that are not easily cut on the small diamond saw. This saw is slow but cuts nice, smooth slabs. This blade has lasted more than 30 years.

The small diamond saw is able to cut small rocks that can be held by hand. It is, however, difficult to make smooth cuts, and the blade tends to wear out quickly.

Basic safety Equipment must be used! You will need to wear goggles and hearing protectors. An apron is also wise (unless you like being splattered with mud and grit, to give others the impression that you’ve actually been working for a change).
Using the large saw

Put on your safety equipment. Decide where the rock should be cut and put it on the vise. Leave enough space on either side of your intended rock slab to account for the thickness of the saw blade (~3 mm).

Place your rock in the vise so that, when it is secured, it protrudes out from the vise to the left (the blade side, in the direction of the arrow) by at least 4 or 5 cm . See details below.

This shows the movable vise jaw (right) moved away from the fixed jaw (left).

The adjustment pin for the movable jaw lifts up, to pull the tooth on the bottom out of one of the holes, circled. With the pin up, the movable vise jaw can be slid back and forth.

The movable vise jaw has been moved into position to clamp the rock. Make sure that the adjustment pin slides down into a hole to secure the movable jaw in place.

The rock needs to be securely clamped between the two jaw faces. The rock must press against the jaw faces on at least three points, or the rock could move during cutting. Moving could damage the blade or the blade drive belt. When the rock is positioned correctly, turn the clamp screw arm (circled) to clamp the rock into place. See that the rock is secure by firmly pulling and pushing on it to make sure it doesn’t move.

Once the rock is secured and you need to adjust the vise position to make the cuts you want. For thin sections you usually make two cuts: an outer cut first, then an inner cut, to make a 1-1.5 cm thick slab. Making two cuts like that means you don’t have to remove the rock between cuts, just adjust the vise. Use the ratchet wrench (circled) to position the vise for the outer cut, with the edge of the vise 2-2.5 cm from the plane of the saw blade.

When the vise is adjusted correctly, roll the vise along the rails until the rock is a few mm from the blade rim (circled). Don’t start the saw if the rock is actually touching the blade.

Push the clutch handle, sticking out from underneath the vise, to the right. This engages a threaded clutch under the vise (not visible here) onto the threaded drive screw (arrow).

There will be something here to secure the lever, so the clutch stays engaged. Shown here is a metal ring, but it could be almost anything: a wire, a spring, or a rubber band, for example. They just keep the lever in position. The clutch handle should be all the way to the right, but not tight. If it is too loose, it will not engage the drive screw threads well enough and the rock won’t advance into the blade. If it is too tight, it could slow the drive screw rotation rate and so slow the cutting. It can even stop the drive screw entirely.

Close the lid and turn on the saw. Make sure you didn’t leave tools inside before you turn it on.

There are two switches. The wall-type switch (blue arrow) turns on the saw blade motor. The turn-switch (red arrow) runs the vise drive screw. It supplies a variable voltage (about 1 to 12 V) to the drive motor, which is inside the gray box. Use full speed (12 V, 24 inches per hour) only for pumice and small rocks. For other rocks set it to about 6 volts to start (about 12 inches per hour). If the saw seems to be binding-up, set a lower speed.
Driving the vise too fast risks jamming the blade. If that happens, the saw blade stops, but the saw blade motor keeps spinning. That will burn-up the drive belt, making a big stink and probably setting off the fire alarm. It’s best to keep an eye on this saw when it’s running.

This shows the display for the saw vice advance motor, with the voltage (red) set to about 6 volts (about 12 inches per hour vise advance). Electric current is shown in blue, here about 66 mA. If it goes over 1 A (reads as >1.000), set a slower speed (say, 3 volts).
The vise advance screw is driven by a 500:1 gear reduction motor. The volts to drive screw RPM is about linear.

If the vise doesn’t advance toward the blade, that might be because the drive motor isn’t plugged in. That’s a little DC power block, off to the side. If that doesn’t fix the problem, are you sure you engaged the vise clutch?
A short video showing how to turn on the vise drive motor, plus a look at all the wires in the box. There are more wires now.
This video is courtesy of George Shaw.

Without opening the lid, look to see if the coolant water is coming out of the tubes on both sides of the blade (circled).

Water should spray around the top of the saw in the plane of the blade (circled). If you don’t see water, turn off the saw and fix the problem. Maybe the water tub just needs more water, or maybe the pump is clogged or kaput. When the blade actually starts cutting. Monitor the saw every so often to ensure the blade does not jam. If it does, shut the saw off immediately or the rubber drive belt will burn through, making a real stink. You will hear the rock end fall off when the cut is complete.

Turn off the saw, lift the lid, disengage the clutch lever (move it to the left) and roll the vise away from the blade.
Do not remove the rock from the vise!

Use the ratchet wrench to move the vise into position for the second cut. The second cut should result in a slab 1-1.5 cm thick. Start the second cut like the first.

Put your rock pieces on paper towel to dry.

Label your slabs and any other pieces you want to keep with permanent marker, or some other legible, water-resistant method. You may want to use the small saw to cut the slabs into rectangular thin section chips before labeling. Here labels are in magic marker, but if you make thin sections, epoxy can get on the labels which makes them almost impossible to read. Use white ink or paper labels (glued on with epoxy) for thin section chips.

To prevent rusting, always leave the lid opened when the saw is not in use.
Using the small saw

Put on your safety equipment. Decide where you want to cut the rock. Place the rock on the saw and make sure it can fit under the guard and is smaller than the exposed blade is high. You can use the metal slider, which helps gently and accurately advance the rock into the blade. However, it can get stuck on grit and otherwise make good cuts difficult. You can also use your hands alone to guide the rock into the blade. Either way, you need a firm, steady hand. Twisting the rock while cutting, or trying to cut edges or curves is what destroys these blades. The first cut should be on the outside edge of the rock so that when you make the second cut there is still rock to hold on to.
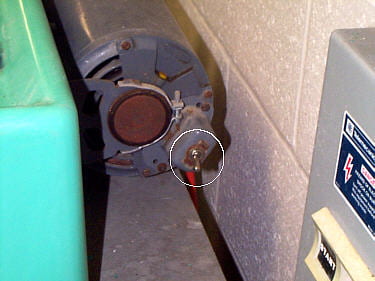
Turn on the saw. The switch is located on the right side of the motor in the back right corner (circled)
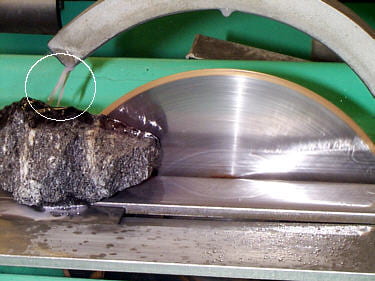
Feel the sides of the blade, or watch for the coolant (water, circled). The coolant should be spraying out from the edge of the blade. If no water is visible, stop cutting and fix the problem. Gently but firmly guide your rock through the blade to make your cut. Do your best to make the cut straight, without deflecting the blade. Note that the blade is not sharp in the usual sense. It will not cut your skin unless you actually press on the blade. It will cut through fingernails, however.

When finished cutting, turn off the saw. You should make two cuts, leaving you with a smooth, even slab 1-1.5 cm thick. You can now mark the slab in pencil with the thin section template, and make four more cuts to give you a rectangular thin section chip.
Place your rock pieces on a paper towel to dry.
Once dry label the pieces you want to keep. Remember that magic marker labels are almost invisible on wet or epoxy-covered rocks. If you make thin sections chips, use white ink or paper labels glued on with epoxy.
For additional instructions on how to make thin sections, see this document. This web page was originally prepared by Heather Barrett.
