Each XRD mode probably has a slightly different procedure, but I think this one is illustrative.
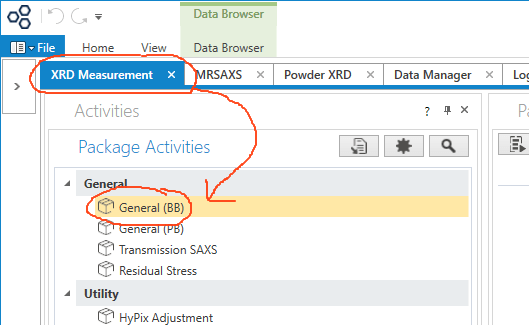
In the XRD Measurement tab, click on General (BB).

If you can’t see the Package Activities window, click on the Activities tab down in the lower-left.
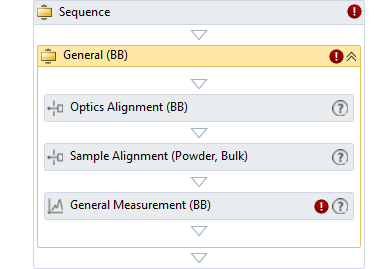
The method sequence window opens. Notice how four items are nested within Sequence, what this window shows, and three are nested within General (BB), the name of this sequence. The three items nested within General (BB) are the activities that can be run in this method.
The initial XRD setup and alignment was done here, so we skip that step.
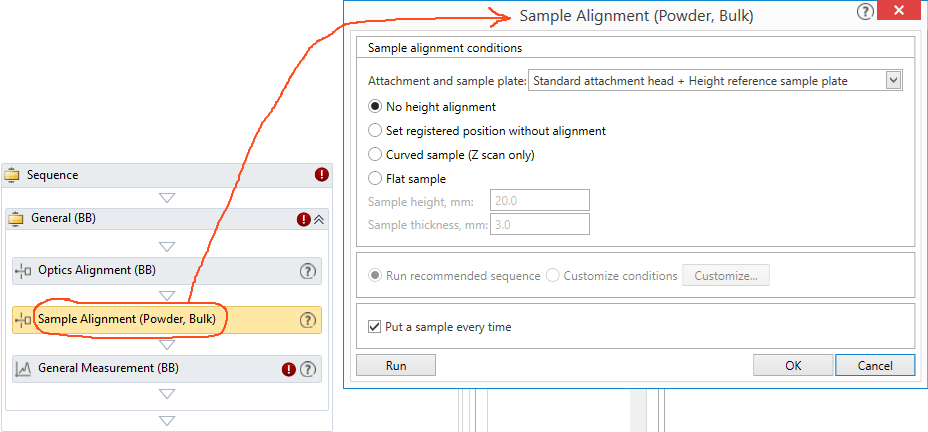
Click the Sample Alignment (Powder, Bulk) sequence item to open the Sample Alignment (Powder, Bulk) window. For more detailed descriptions, but using a different detector, see this from the Help system.
Sample alignment is done for every sample, unlike the Optics Alignment.
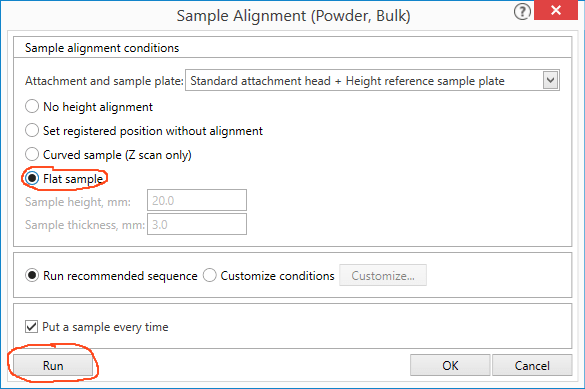
In the Sample Alignment (Powder, Bulk) window, make sure the options are all as shown, especially the Flat sample setting, and press the Run button. You will have to wait a bit while the software queries the hardware for its current configuration. Sometimes you have to press the Run button twice.
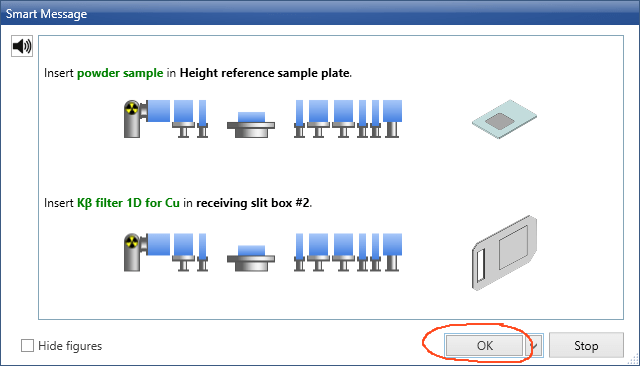
A Smart Message window opens, showing what you need to check or change in the hardware, inside the XRD. Blue means check that the thing is there or put the thing in, red means take the thing out. This is telling you two things:
1. Put your powder sample holder into the stage clip, replacing whatever was there.
2. Put the Kβ filter back into its proper place.
The software shows pictures of the things you have to check or handle, and approximately where they are taken from or put in. When you think everything is right, press OK.
If you changed the configuration correctly, the sample alignment procedure will start. You can watch its progress in the Sample Alignment (Powder, Bulk) running window.

Here are the things described immediately above: 1 is the sample, clipped into the standard stage, and 2 is the Kβ filter, put in its proper slot.

Here is the Sample Alignment (Powder, Bulk) running window, with its progress bar.
When the alignment is complete, this window closes.

Close the Sample Alignment window by pressing OK.
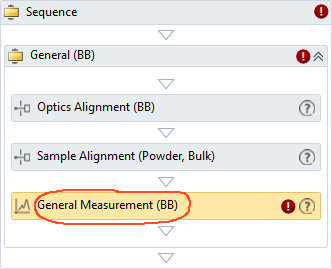
In the Sequence window, click the General Measurement (BB) item.

The General Measurement (BB) window opens. This is where you list all your samples, start and stop 2Θ range, data step size, and speed, and enter comments. Usually the other variables have already been chosen, or we don’t have them as options.
First click the Separate measured file check box. This makes sure you will save your data as a file.
Second, notice the red circle with an X. That means you can’t use the Run or OK buttons until that’s fixed. Click on the … button, find or make the folder you want data stored in, and type in a file name.
Third, click the Move to home position after the measurement [is] completed check box. This one probably isn’t so important, but it puts the goniometer arms in familiar positions that are also easy to work on.

When done, the table should look something like this: a folder path with a file name at the end, the right start and stop angles and so on, and the proper check boxes checked.
If you are happy, you can press Run, and the diffraction pattern will be acquired and saved. You can put large numbers of run conditions here. I think each checked run condition will be run for the same sample. That is, if you want to run a sample at 5-80° at 20° 2Θ per minute (a good place to begin), and 1 to 10° at 1° 2Θ per minute, check both run condition boxes and both will be run. I’m not sure of this, but give it a try.
