Menu items are really just links to your content, so the content must be created before you can populate your menu.
Quick menu:
Create a new menu
Create a menu
Add items to your menu
Arrange your menu items.
Create a New Menu

If you havent created a menu yet, you’ll need to create one.
Go to your Dashboard.
- In the Admin Bar, hover the name of your site to get the dropdown list and select Dashboard. OR
- Click on the name of your site to toggle back and forth from viewing your site to your Dashboard.
- In the left sidebar menu, hover over Appearance and select Menus.
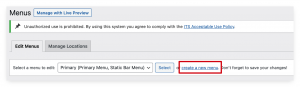
Click on the “create a new menu” link at the top of your screen.
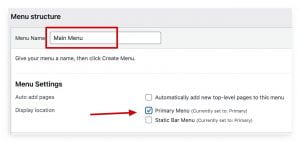
Give your new menu a name – something creative like “Primary” or “Main” – and check the Primary Menu box to make this your primary menu.
Dont forget to click the “Create new menu” button in the bottom right to save your new menu!
![]()
Adding Items to Your Menu
In the top section of the window, make sure that the menu you want to edit is selected. Choose your menu from the drop-down list, and then click the “Select” button.
![]()

Now you’re ready to add pages, posts, categories, links, etc. to your menu.
In the left Add Menu Items box, we’re in the Pages section and the process is the same for the other sections such as Posts, Links, Categories, etc.
Notice the tabs at the top.
The default is the Most Recent itmes. If you don’t find what you’re looking for, you can click the View All tab to see all of your pages, or click the Seach tab to type in what you’re looking for.
Click the check box of the items you want to add to your menu. You can check more than one.
Click the Add to Menu button.
To chose a Post, click on down arrow to open that section and you’ll see a checklist of your posts.
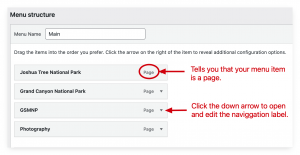
Now that you’ve added some items to your menu, you can edit the navigation label and move things around.
Bypass the theme default of using your pages and posts as menu items.

Dashboard | Appearance | Theme Options | Navigation | Pages tab
- In the top section, uncheck all of your pages to exclude the pages from the Navigation Bar
by clicking on the green check marks to change them to red X’s - Make sure that the Show dropdown menus and the Display Home link buttons are enabled
- Do the same thing for your posts by selecting the Categories tab and unchecking your posts
- Scroll down and Save your changes.

Now we need to create some menu items.
Dashboard | Appearance | Theme Options | Menus
You can select any of your pages, posts or categories as menu items. For this example we’ll use pages for our menu items, but the process is the same for posts and categories.
- Click on the down arrow to drop down your list of pages
- Check the boxes beside the pages you want to make menu items.
- Click the Add to Menu button
 and you’ll see those items appear in the Menu Structure to the right
- You can see that WordPress automatically adds Home and Help menu items
- In the Menu Setting section under the Theme Locations, check the box that says “Primary Menu” to set this menu as the main navigation in your header.
- Save your new Menu
Now you can move those menu items around and change their level by clicking and dragging the item. The configuration in this image will make New Page 1 and New Page 3 main menu items, with New Page 2 being a sub-item or child of New Page 1.
Save your menu ![]()
View your site by clicking on your site name in the black Admin Bar, and your new navigation menu will look like this:
If you want to change the label for the menu item, go back to the menu structure Dashboard | Appearance | Theme Options | Menus
- Click on the down arrow beside the menu item you want to change and a drop-down box will open up with some additional configuration options.
- Enter the new name in the Navigation Label text box
- You can delete the entire menu item by clicking on the red Remove text link. This will remove it from the menu but it does not delete your page.
Save your changes ![]()
View your site and your new menu will now look like this: